“Reducing Classroom Questions”

When I first started teaching online classes in 1999, I had converted my traditional EMS course over to an online course.  I quickly found myself spending significantly more time running my new online classes than I ever spent in their traditional counterparts.  When I approached the Division Chair about the amount of time I was spending in the class he had a simple response to me: “work smarter not harder.”  Since that moment, I have made these four words my motto for teaching and designing online classes.

Online instructors are constantly responding to a variety of questions and issues in their courses.  Everything from: “…when is the last day of class?” to “…I don’t understand how to complete this assignment.”  We notice that many of these questions have nearly identical responses yet some still type the response every time finding that much of our precious time is spent answering the same questions repeatedly rather than engaging the students in material specific questions.  So how do we fix this?  Work smarter not harder!

So how do we work smarter in an online class?  Here are a few suggestions that I have used that has made life much easier when dealing with classroom and e-mail questions:  Create a “Classroom Questions” discussion forum, create a FAQ area in your class, or use a program designed to reduce the amount of typing necessary.

Create a Classroom Questions Discussion:

Let’s first compare a traditional classroom to the electronic counterpart.  In a traditional (brick and mortar) classroom students are able to ask questions in real time.  Likewise, the other student is able to hear the question and benefit from the instructor’s response.  Unfortunately, in an asynchronous online class that uses e-mail as its primary form of instructor to student interaction the instructor has to answer the same question multiple times.  Email is devoid of broad spectrum broadcasting unless the originator of the e-mail specifies multiple recipients. 

We can somewhat duplicate the classroom environment by adding a discussion forum in the class and requiring students to ask non-personal, class-related questions here.  Students are directed to read the classroom discussion questions to see if they can find their answer here first.   If their question hasn’t been asked, the student posts his/her question to the discussion board and awaits a response from the instructor or fellow student.

What this method of question and answer does is multi-faceted.  First, students are able to find their answer almost immediately if the question has already been asked which is a big sell for today’s “right now” millennial generation.  Their fellow classmates will many times answer the question quicker than the instructor can.  (If this happens, I highly suggest that the instructor respond to the student as well validating the other student’s reply.)  Finally, and nearly as important, this method will dramatically reduce the number of e-mails, especially duplicate questions, the instructor receives.

Use Shortkeys: ( www.shortkeys.com )

Shortkeys is a program that creates a macro set allowing you to launch as much or as little text as you would like with just the stroke of a few keys.  Shortkeys has a “lite” version that is free and will enable you to create up to 15 different “shortkeys” to launch at your leisure.  This program works great for e-mail and anytime you need to enter the same text over and over again.  As with most “Web 2.0” tools today, you can upgrade to a premium version for about $25.  When using ShortKeys, you simply create a new shortkey and enter the text into the text box area.  Then you create a “shortkey” that will tell the program to insert the text where you want it.  A shortkey can be anything you want it to be but here are a few suggestions:

  1.  Make the shortkey something you would never normally type, otherwise every time you type the word or letters, the program will try to replace them with the text you have selected.
  2. Make the shortkey something that would be easy for you to remember.

Let’s look at one of my shortkeys:

  1. The Shortkey is:  “noid1”
  2. When I type in “noid1” the following text appears:   “Thank you for your question, I will be happy to reply to your question once you supply me with the following information:  Your full name, Your Class, Your Class Section Number, and Your Student ID.”

Shortkeys can be downloaded at:  www.shortkeys.com

I use both the “Classroom Questions” area and Shortkeys simultaneously to work smarter and not harder in my online classes.  There are a variety of other methods you can use to reduce the number of questions and e-mails you receive but these are the two that I have found the most useful.

This information came from a recent edition of The Chronicle of Higher Education.  “How to Rip DVD Clips” was a recent post by Prof. Hacker.  http://chronicle.com/blogPost/How-to-Rip-DVD-Clips/26090/?sid=wc&utm_source=wc&utm_medium=en

http://www.wcl.american.edu/pijip/go/blog-post/worth-the-wait-installment-1

http://www.ncvital.info/

Poll Everywhere

Posted: October 9, 2009 in Uncategorized

My good friend Dave Page introduced me to the coolest software called Poll Everywhere (www.polleverywhere.com).  This software is free for up to 3o students and allows you to use the student’s cellphones as polling devices where you see real time feedback integrated directly into your powerpoint presentation.  It is extremely simple to use!  Simply create your free account at www.polleverywhere.com and then create your first poll.  You can select from multiple choice, open ended, and goal poll (I have not used this one yet) and then simply create the question you want.  Poll-everywhere-types

The system will then generate the poll for you and give you an opportunity to download the powerpoint slide. 

poll-everywhere

 Simply copy the second slide in the presentation that you downloaded and paste it into your presentation wherever you would like. 

Poll-everywhereSecond-slide

 When you present, make sure you have a connection to the internet and you are good to go!  When your slide comes up your audience (students) will have an opportunity to respond to your question by texting their answers to a designated number.  You and your audience will be able to see the results update live as they come in.

polleverywhere-slide

FREE Limitations:
As with all web 2.0 technologies, you have a few limitations that are removed when you upgrade.  One such limitation is the “Poll Everywhere” logo.  This logo remains on the slide and can’t be removed unless you have upgraded your account.  Another limitation is the number of responses that you can receive.  If you have the free account, you are limited to only 30 responses which is fine for most classrooms.  With the free account you are not able to generate a unique word for texting open ended question responses as it automatically generates it’s own code.  (This is not such a big deal…just a little more cumbersome for the texting audience as they must now text a 5 digit code + their question or response instead of texting a single word then their response).

Best/Worst Practices:
I was speaking to an audience of 70+ Paramedics and educators while using www.polleverywhere.com .  At the beginning of the session I use both types of questions (open ended and multiple choice) to briefly educate the audience on how to use the texting responses.  Then throughout the presentation, I run a note on my slides that says “for questions, text ____ + your qestion to _______” and then had the question slide pop up at various times through my presentation. 

poll-everywhere-example

This way the audience member could text a question as soon as they think of it.  Then  I would see the question when I got to the slide with the questions poll.  This is a great way to leave your class interactive and non-distracting by holding questions until the appropriate time.

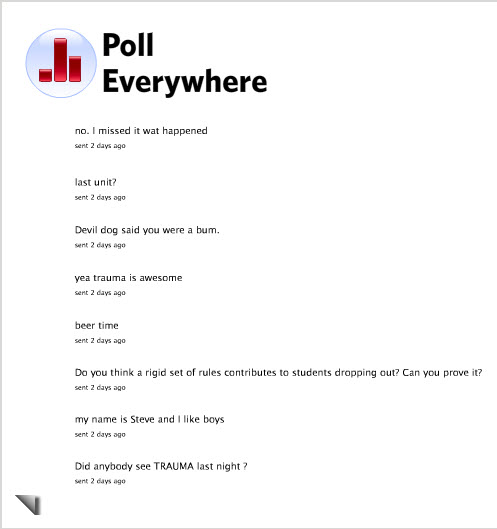
One thing I did learn was to know your audience and BE CAREFUL!  Open ended questions can set you up for some questionable material to be posted.  In the above session my practical jokers started having a little too much fun with the tool.  In this case, it added some humor to the course but made me VERY nervous not knowing what was coming next (See example below).

polleverywhereOpen-ended

As usual…with an upgrade you can get the benefit of moderation for this type of poll so that you can avoid questions that could be off topic, vulgar, or inappopriate.

Overall, I am excited to find this software and will continue to use it.  I am seriously considering upgrading to a more premium account already!

Utterli for Education

Posted: December 17, 2008 in Uncategorized
 
This is an Open Source site where you can post video messages / posts.  You can even post them with your Cell phone.
 
Some Educational Uses that I have seen:
 
  1. Instead of using static text posts to discussion boards, students are posting “utterz,” or video posts to Utterli and generating conversation and interaction.
  2. Instructors require students to post a set number of video journal postings regarding the course material.
  3. Instructors post a discussion question and require the students in the class to post a video response.
I am sure you can think of other ways you can use this tool in an online class!  This makes the class more interactive and engaging the students with the instructors and each other.  Rather than responding to the name “Jenny X” in the class, you can see and hear “Jenny X” and then reply to her with your own video post.

Student to Instructor Ratios

Posted: October 17, 2008 in Uncategorized
I just finished responding to a question about class size in an e-mail group I am a part of.  I thought I would add the response to my blog as well.
The class size is directly related to the design of the course. 
 
If the course is designed with large amounts of interaction between students and instructors (student to student / Instructor to student) then the class size must be limited to allow adequate interaction and engagement with the instructor.  In other words, you must keep the student to instructor ratio to around 15:1.  Otherwise you are doing an injustice to both the student AND instructor.  The students will not get the timely feedback they want and deserve and the Instructor will be overwhelmed with the amount of work required to run the course.
 
On the other hand, if the course is designed with minimal instructor engagement you are much more free with your ratios.  These courses are designed using “objective” assessments of the material using the LMS’s testing/quiz features to deliver and grade the assessments.  The students are split into groups to work as “teams” to complete any subjective assignments which then reduces the number of papers etc. that the instructor must grade.  This reduces the amount of time the instructor spends on individual papers so he/she can concentrate on a more global discussion.  Using this method the instructor can get away with a larger student to instructor ratio such as 30:1
 
Sometimes, subjective assignments can be completely taken out of the equations which will then dramatically increase the manageable class size.  Let the LMS do the work for you by quizzing and testing the students understanding of the material.  This gives the students instant feedback, saving the instructor the work of grading.  This allows the instructor to become more of a “Facilitator” or “Guide on the side” who answers questions as they arise.  Discussions can still be used to clarify topics that are still somewhat unclear.  With this method I regularly run courses with an student to instructor ratio of 100:1 and have run classes as large as 500:1.

Using a skills coordinator for your hybrid courses will help improve the communications and flow of your on site session.  A Skills Coordinator (SC) is responsible for communicating with the lead instructor several days/weeks in advance of the skills session.  The SC needs to find out exactly what skills are going to be covered. 

At that point the SC will formulate a plan to determine how many students will be there, the number of assistant instructors and equipment necessary and on hand.  This plan will include how much time needs to be spent on each station, what material will be covered at each station, and what equipment should be present at the station.  Once all of the plans have been finalized for each station, the SC will then determine what instructor to assign to each station.

Several days in advance of the skills session, the SC should forward DETAILED information to each skills instructor.  The details of this information should include information such as:  What the instructor is responsible for covering, step by step guides if available, how much time the instructor has to cover the material per group, and how many students to expect per group.  This gives the instructor a heads up with time to prepare for the session.  One of the worst things to do is to bring in instructors unprepared.

The last responsibility of the SC is to be the time keeper on the actual day.  The SC should have a detailed schedule built for the day and must adhere to it.  He/she should monitor the day’s activities and make sure everyone remains on task.  The SC should come prepared to say things like: “hey guys, it’s 10:15, you have 5 more minutes before we have to switch.”  This will help everyone stay on task and keep the day’s skills flowing.

By using a Skills Coordinator in your hybrid course, you can organize your days and help provide well prepared instructors.  Your instructors will appreciate the advance notice and study time, while your students will appreciate the organization and quality of the sessions!

PowerPoint to Blackboard

Posted: April 20, 2008 in Uncategorized

If you are using PowerPoint to deliver your e-learning and just loading the presentations into blackboard, you will want to read on. 

When you upload a PowerPoint file to Blackboard, you are giving away your intellectual property for others to download and potentially use again.  Trust me, I know.  When I first started creating e-learning in 1999, I had my presentations showing up all over the state.  Previous students were downloading them, removing my name, and taking credit for my work.

There are a few ways to prevent this from happening.  The best solution is to use software to compress and copy protect your presentations.  Impatica and Articulate are two different solutions to look at.  I use Impatica since this is what DCCC provides.  Impatica will dramatically compress the file sizes (20mb down to less than 1mb) and makes it nearly impossible for someone to download your presentation. 

If you don’t have access to a software solution you can use PowerPoints built in features.  Save the presentation “as a web page” and then load it into Blackboard.  This will make it very difficult for somone to copy or take your presentation since it is now in multiple files.

Here’s how to save as a webpage:
1.  Click Save as
2. Under “Save as type” select “Web Page”
This will creat two main files, a folder with all the presentation files in it and an html file outside the folder.
3.  Highlight both the file folder and the html file
4.  Zip these files with your zip program

Now you have your PowerPoint presentation ready to be loaded into your BlackBoard course.

Here’s how to load your zipped files into Blackboard so students can see them:
1. Go to Control Panel
2. Go to the location you want to load the file
3. Click to add an “Item”
4. Enter the information (Name, text information)
5.  Attach the Zip file from above
6.  Change “Special Action” to “Unpackage this file”
7.  Click “Submit”
This will bring you to a different screen where all of the files in the zip file has been opened.  You will see them under “Embedded Media Information”
8.  Beside “Entry Point” select the .htm file (same one that you zipped earlier)
9.  Select “Yes” to Launch in new window
10. Click “Submit”

You have now loaded your presentation into Blackboard in an HTML file that will allow the students to view the presentation as a web page.  Your material will be more difficult to download or copy. 

Negative:
Loss of animations:  Anything that you had animated in PowerPoint will be static in the HTML file that you loaded.  If you have items that animate and cover other items, you will have to change those slides to prevent the objects from covering each other. 

File size:  If file size is an issue, you may find this method will actually increase your file size somewhat if you are using sounds.  (It actually exports all of the sounds into .wav files and loads them into the folder with everything else.)

Positive:
Navigation additions:  The presentation (at least in PP 2007) includes a frame with the outline on the left hand side.  This provides the ability to quickly “jump” around the presentation as necessary.  Especially if the students had to quit halfway through the presentation.  They can then come back and jump straight to where they left off.

Whether you choose to use a compression software like Impatica or Articulate, or you use the web page feature of PowerPoint, you should protect your intellectual property.  Like it or not, there are people out there who will use your intellectual property for something other than what you intended on.

I found a really cool website for use in the classroom or e-Learning.  www.ustream.tv is awesome!  You can create an account for free and then create a room or multiple rooms to use.  All you need is connection to the internet and a web cam and you are ready to stream your class!  This would work GREAT for a couple of different things:

1.  Synchronous lessons:  In place of using the “chat room” feature of your class, you could use ustream to broadcast yourself and have all of your students log in and view your lecture.  There is a “Chat” function where your students would be able to ask questons and you could answer the questions with video and voice.  The site offers a “Record” function so you could record the session and then archive it so your students could go back through it, or watch it if they did not make the class.

2.  Traditional classroom:  If you are teaching a traditional classroom, you could setup the webcam and broadcast your traditional lectures.  All of your students could be given your web address (which does not change) and could login and watch the class from a distance if s/he is not able to attend the traditional class.  This way the student could still login and get the material if s/he is sick.  Again, you can record the lessons giving students the ability to watch your lectures again to review something they did not quite understand or to review for exams.

This technology is FREE and a great opportunity for multiple ideas.  I will be anxious to see the support from the service and if it ever becomes a paid site. 

Online Learning Resources

Posted: March 14, 2008 in Resources

Free Stuff That I use:
www.ustream.tv
http://audacity.sourceforge.net/
http://www.yugma.com/

Development Tools I Use:
MS PowerPoint
Snagit
Impatica for PowerPoint
Captivate
Adobe Photoshop